
Technology
7 essential tips for using Gmail on your phone
Gmail is the email client many of us rely on to manage the mountains of messages piling up in our inbox. It has a whole host of features that can help with that, from automatic email priority to label support.
Here we are going to focus on the features available in Gmail Android And iOS. When you’re away from your computer, it’s even more important that you can catch up on emails quickly and easily, and that’s where these tips come in handy.
1. Swipe to action
When you see a list of emails in Gmail on mobile, you can swipe left or right on each email to take quick action. For example, you can archive one or mute notifications for a conversation. These swipe gestures will help you get through your emails much faster.
To set which swipes trigger which actions, then tap the three horizontal lines (top left). Institutions. Crane General settings And Swipe actions (Android) or Inbox adjustments And Email swipe actions (iOS) to choose actions for the left and right swipes.
2. Automatically forward emails
By default, when you archive or delete a message you are reading, you are returned to the list of conversations. Sometimes that’s the best course of action, but you might prefer to skip to the next message in the list.
However, you can only adjust this on Android, as the feature hasn’t made its way to iOS yet. Then tap the three horizontal lines (top left). Institutionsthen choose General settings And Continue automatically to move from one message to another.
3. Smart answers
The Gmail app can generate quick auto-replies based on the content of your email threads, such as “see you later” or “thanks for that,” and they can save you time if you need to reach a lot of people quickly.
When smart replies are turned on, you’ll see them in boxes below the last message in a conversation. To turn them on or off, tap the three horizontal lines (top left) and select Institutionsand then tap your Gmail username Smart answer (Android) or regular Smart answer (iOS).
4. Manage notifications
No one needs notifications anymore, and the Gmail app can be smart about which emails trigger a ping on your phone. This configuration depends on whether you’re using Android or iOS, as the two platforms generally handle notifications differently.
On Android, tap the three horizontal lines (top left), Institutionsand your username. below notifications you can choose to receive alerts only about high-priority emails. You can further customize these warnings via notifications, App notificationsAnd Gmail in the Android settings.
On iOS, then tap the three horizontal lines (top left). Institutions. Crane Email notifications to choose which messages trigger a ping. You can further customize your notifications by going to iOS Settings and then choosing notifications And Gmail.
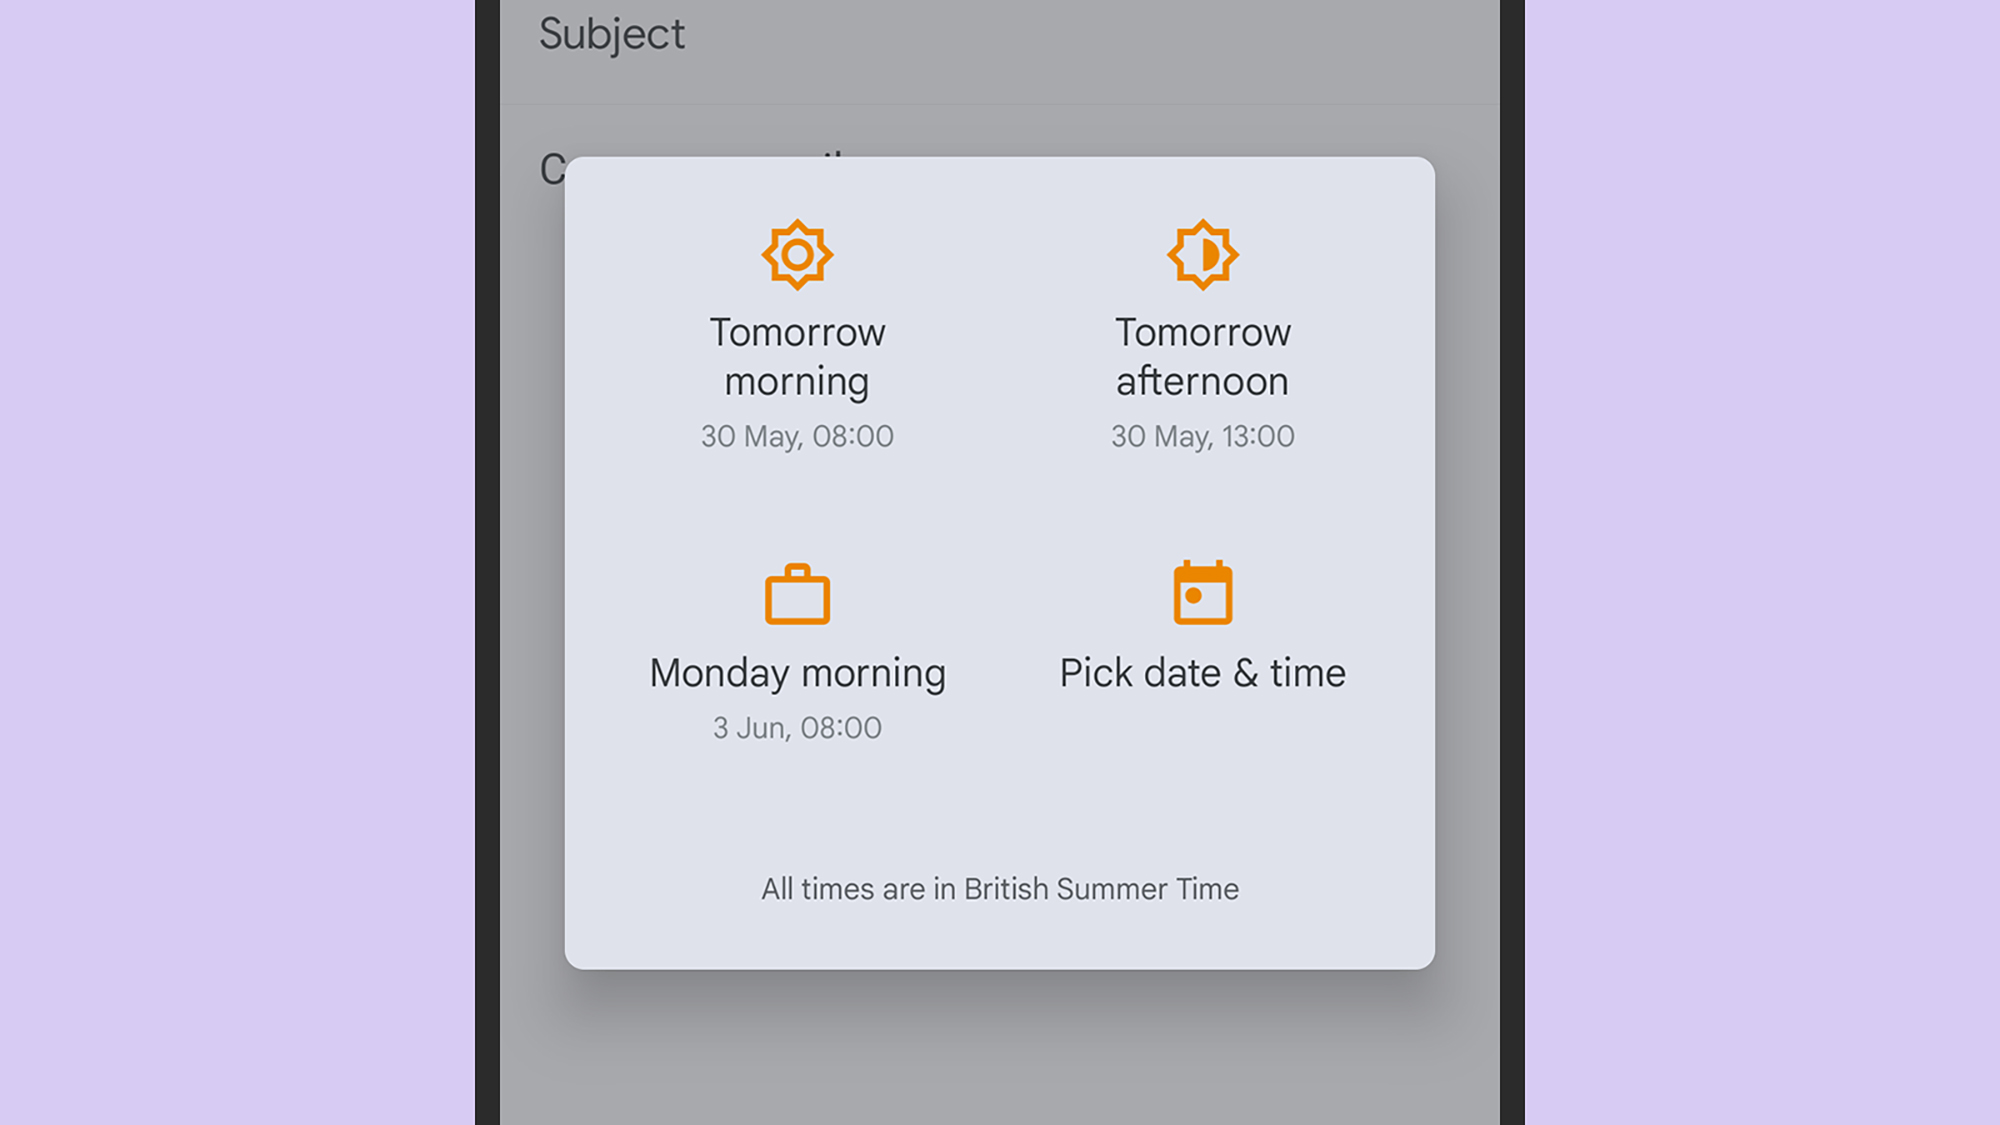
5. Schedule emails
Scheduling emails can be a useful way to ensure you don’t disturb colleagues outside of office hours, or to prevent anyone else from knowing what time you worked. You can even use scheduled emails to send yourself notes and reminders to complete tasks.
When composing a message in the Gmail app for Android or iOS, tap the three dots in the top right corner and choose Plan shipping schedule. You will see some suggested times, but you can also set a custom time yourself.
6. Set the inbox type
The Gmail app also lets you set the inbox type, which affects which types of email you see first. It might be better for your workflow if you see all unread emails at the top of the app, or all messages you’ve starred or marked as important.
Then tap the three horizontal lines (top left). Institutions. Choose your username there and Inbox type (Android) or regular Inbox type (iOS) to view the different views available.
7. Manage multiple accounts
Here’s something you may not have realized: you can manage multiple email inboxes from the same Gmail app. For example, you can switch between work and personal email, or set up a separate account for your current part-time job.
To add another account from the app, tap your profile photo (top right) and then choose Add another account. You can add accounts you have with any provider (including Gmail, iCloud, and Outlook): just tap the name and follow the instructions.